#9 Square DIY
Explore tagged Tumblr posts
Visit Tumblr Blog
Explore Tumblr blogs with no restrictions, modern design and the best experience.
Last Seen Tumblr Blogs


Fun Fact
BuzzFeed published a report claiming that Tumblr was utilized as a distribution channel for Russian agents to influence American voting habits during the 2016 presidential election in Feb 2018.
Text
DIY Main Menu -- How to customize it!
Hi howdy! This is the Tumblr mirror of a tutorial posted to my Patreon. The contents are the same, so choose whichever you prefer for reading!
What you'll need for this tutorial:
The DIY main menu .package, found in the main posting
FFDEC / JPEXS decompiler
Photopea (or an offline image editor that can do the same)
Sims 4 Studio
Let's get started!
Preparation 1: Create your images using the size templates provided!
Here they are! They can also be found on Patreon (for free, of course)


Preparation 2: Resize your images using photopea, and save as .png
Open each of your images in photopea (or editor of choice), and squish the canvas into a square!
The main menu background should be 1600x1600 pixels! The sidebar should be 1000x1000 pixels!
Do not try to make them larger for 'more detail', they will break!
Step 1: Open [sdm] DIY mainmenu in Sims 4 Studio
Self explanatory, open it by double-clicking, or by clicking the 'my projects' button and navigating to the file.
Step 2: Export the first item in the warehouse
It should be a Scale Form GFX type! Right click, and select 'export'. Name this something you'll remember, and save it in a folder you'll come back to!

Step 3: Rename the exported file so it has the extension 'swf'
Self explanatory! Windows will may warn you that it may make the file unusable, but you can ignore this!
Step 4: Open FFDEC/JPEXS, and open the now .swf file
Step 5: Expand the 'images' hierarchy, and scroll all the way down until you find the images labeled 354 and 356!

These images are the main background and the sidebar background respectively.
Step 6: Right click and replace ONLY images 354 and 356 with the images you prepared earlier
Remember, the main background (354) MUST BE 1600x1600 pixels, and the sidebar (356) MUST BE 1000x1000 pixels!
Step 7: 'Save as' a new .gfx or .swf file
The filetype here doesn't matter! You can also just save over, but I like keeping backups.
Step 8: Re-import over the original in Sims 4 Studio
Right-click the same item in the .package's warehouse that you exported earlier, but this time, click 'import'.

Select the .gfx/.swf you saved earlier!
Step 9: Save the .package file, and rename it if you intend on distributing
You can rename the .package file just how you would any other file! Try and include your creator's handle in it, so it the edit can be traced back to you.
Step 10: Test and enjoy!
While I'd like to think this tutorial is pretty straightforwards, please let me know if you have any questions :D
#non cc posting#txt#THE MOD DL WILL BE UP IN A SECOND I JUST NEED TO#MAKE THE TUT POSTS CUZ THEYRE LINKED IN IT LOL
38 notes
·
View notes
Text
DIY Side Table

Project by Silvia Song:
Finding a simple, modular piece of furniture that is reasonably priced but also well made can be hard sometimes. IKEA provides some decent options, but sometimes you just want something made out of beautiful, sturdy, solid wood. Thankfully, designer Silvia Song has created a great tutorial for a simple wood side table with a sliding drawer. If you’re interested in getting into woodworking and furniture making but don’t know where to start, this is the tutorial for you. She’s made a lovely piece with clean lines and a basic form that requires only a few tools. If you want a fun building project for a fall weekend, you should definitely try it out. Thanks for sharing, Silvia! — Kate

I chose this project as an exercise to see if I could design and build a simple drawer unit in the spirit of Enzo Mari’s Autoprogettazione (self-design). I wanted to use just a few simple hand tools and assemble each part by cross cutting only off-the-shelf lumber. The biggest challenge was to find a way to work with the actual dimensions of lumber to come up with puzzle-like pieces simple enough for a novice to build, but not lacking in versatility. My intentions were to keep things as simple and organic as possible, but you can easily personalize it by staining or painting the wood. I really enjoyed designing it, and I hope you enjoy building it! — Silvia

Materials
hammer
cross-cut hand saw
engineered square or 90-degree triangle
sanding block
pencil
lumber: (3) 1” x 6” x 6’, (1) 1” x 4” x 6’, (1) 1” x 3” x 6’, (1) 1” x 2” x 6’
box of #16 x 1 1/4″ wire nails
Instructions
1. Let’s begin by building the frame. Cut lumber to the dimensions below using a right angle tool (engineered square or 90-degree triangle) and lightly sand the edges.
(6) — 1” x 2” x 11” corner supports (for lateral support)
(4) — 1” x 6” x 18” top and bottom panel
(4) — 1” x 6″ x 20” side panel

2. Side panel assembly: A minimum of four nails per 1 x 2 support is required. It is crucial to nail directly into the center of the 1 x 2s. These pieces will support the frame laterally once it is upright.

3. There should be a 2 1/2″ space between the first and second 1 x 2s as shown in the photo. Add an extra 1/16″ to allow the drawer to slide easily in and out.


4. Let’s go ahead and complete the frame by assembling the top and bottom panels as well. Place (2) 1″ x 6″ x 18″ planks and nail them directly into the 1 x 2 supports. Make sure the nails are driven directly into the center of the supports.

You should now have a completed frame that looks like this:

5. To assemble the drawer, cut lumber to the dimensions specified below.
(2) — 1” x 6“ x 15” front and back planks
(2) — 1” x 4” x 9.5” side planks (one on each side)
(2) — 1” x 3” x 11” outermost side planks
(2) — 1” x 4” x 15” bottom end planks
(1) — 1” x 3” x 15” bottom middle plank

6. To assemble the bottom of the drawer, use (1) 1″ x 3″ x 15″ plank sandwiched between (2) 1″ x 4″ x 15″ planks. Place the 1″ x 4″ x 9.5″ side planks on both ends of the bottom planks and nail them down securely.

Here is what the completed side looks like:

7. Take (1) 1″ x 3″ x 11″ outermost side plank and align as shown in the photo. This will create a lip underneath the front and back panels to allow the drawer to be pulled out.

8. Then center the piece along the innermost side plank so that the edge of the 1 x 3 is flush with the front and back planks, and nail them down. Repeat for the opposite side.


Here is the finished drawer assembly:

9. Finally, slide the drawer into the frame.

Done!


23 notes
·
View notes
Text
Extremely Strong Shower Bench
I've gotten feedback from the community asking me to share my plans, so here it is. If you want to build your own shower bench, this is how you do it. Make sure to ask a thinno for help, this will not be easy to do!
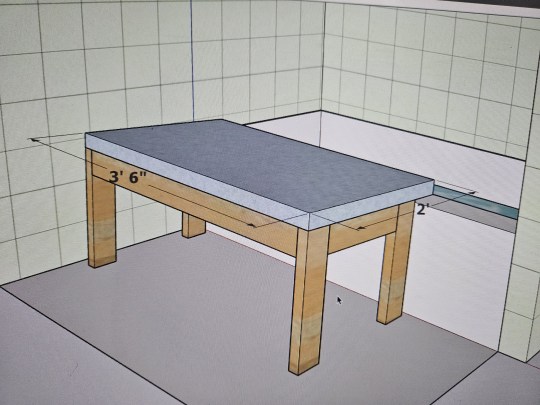
This is an extremely strong shower bench with a 1000+lb capacity. The floor under you will fail before the bench does! This shower bench is designed to remove you from the shower and basically have you sit on the ledge. You will need a couple feet of clearance away from your tub's ledge for it to work.
The top of my tub's ledge is about 1' 3⅜" up from the ground. If yours is taller/shorter by more than ¼" or so, you will need to make some adjustments to measurements down below.
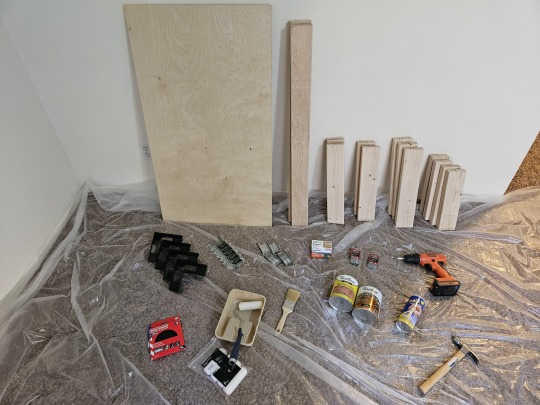
This is a photo of the materials I used to make this build. I got everything I needed at my local hardware store. My build wasn't perfect though. I would suggest you learn from my mistakes and acquire a slightly different material list though:
1x 2'×4' plywood sheet. Get something pre-sanded and rated for outdoor use. I recommend ¾" thick.
2x 8' 2×4s. Most any wood type will work, so get what you like most. I just got some normal 2×4s and made sure they looked pretty. If you don't want to bother with staining or weatherproofing the structure of your bench, get pressure-treated 2×4s.
4x 2' ½"×½" square dowel.
4x Simpson Strong-Tie RTC2Z. Get the black-powder-coated ones if you can.
2x Simpson Strong-Tie LUS24Z. These will be used for the cross beam.
4x Simpson Strong-Tie FB24Z. These will be the feet.
1x Simpson Strong-Drive SD9112R100 #9×1½" 100ct Connector Screws. You won't use the whole box. It comes with a bit.
4x 3" common nails.
32x 1½" common nails.
35x 1" brad/finish nails.
200-220 grit sandpaper.
Oil-based high-gloss polyurethane.
Small dense-foam roller & roller pan.
If you're applying stain, oil stain & staining brush for oil stain.
Liquid rubber. Get something that will provide grip.
Rubber-foam weather stripping. The thicker and wider, the better. I got 20' of 1¼"×7⁄16" and it worked great for me.
4x paper clips, hair ties, or something to hang the feet from.
A plastic tarp, thickness is more important than size.
As for tools, you really only need two things:
Hammer
Drill, ratchet, or socket screwdriver
OPTIONAL: File or knife
I also highly recommend some PPE. Get some cheap/disposable cleaning gloves, a mask of some type, hair ties for your hair, and an old change of clothes.
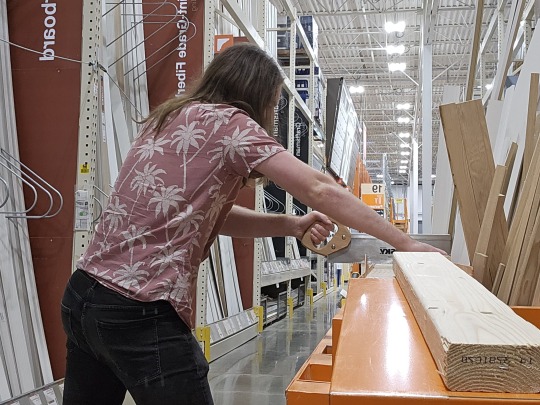
If you don't have access to a table saw at home, *don't leave the store yet!* You need to cut your wood at the store. Many home improvement stores will cut your lumber for you, either for free or for a low price.
Ask an employee to cut the two 2×4s like this:
2×4 #1: 38", 38", 17"
2×4 #2: 33½", 33½", 13", 13"
NOTE: If your tub ledge was taller/shorter than mine, then for every 1" difference, lengthen/shorten each 33½" cut by TWO inches.
Then ask them to cut two dowels down to 20½", and two down to 24".
You should also ask them to take 6" off the short side of the plywood, so it's 2'×3½' instead of 2'×4'.
You're not ready to leave yet! You need to make two more cuts, and the store employees will not help you with these. Many home improvement stores will have a DIY handsaw table where you can cut moulding down to length. You'll need to use this to make the last two cuts yourself.
You need to make an ANGLED cut into the 33½" boards. Lay the first 33½" board down flat as shown. On the edge closest to you, mark a point 1' 5⅛" away from the left end of the board. Then on the edge farthest from you, mark a point 1' 5¼" away from the same left end of the board. Position your saw across both points, and cut through the board. You may need to roll the board over to finish the cut.
NOTE: If your tub ledge was taller/shorter than mine, then for every 1" of difference, add/remove 1" from the 1' 5⅛" / 1' 5¼" measurements above.
For the second board, *do not measure!* It is more important that the cuts in the boards be identical than it is for any one cut to have exact dimensions. Lay the second board down, then set one of the cut pieces on top so the ends of the two boards are aligned, then use the existing angle in the cut piece to start the cut in the second board.

When you are done, you will have four boards, two slightly taller than the others, with the exact same angle cut in all of them. In the above photo, the boards are resting on their angled ends. These pieces will be your long and short legs.
NOW you can bring everything home.
First, lay down your tarp somewhere. Ideally you'll have access to a 5'×10' flat area outside.
Then you need to sand *everything* (except the big faces of the plywood, and the pressure-treated wood if you went that route). Pay special attention to the corners and cuts in the wood.
Now you need to attach the square dowels to the outside of the plywood board. Choose a face of the board to be the "up" face, the one you'll sit on. Put the 24" dowels on top, right along the short edges. Choose a long edge to be the back, and squeeze the two shorter dowels in along it between the side dowels. Nail everything down with the finish nails.
Next is staining, if you chose to stain. Apply according to the directions on the tin. You will likely have to do multiple coats.
Now the truly hard part, applying polyeurethane. I recommend using the foam roller for this and applying many coats. You can prop up the plywood sheet using the 2×4s if you like so you can get all the way around the edges in one pass. You'll still need to flip it over and do three more passes when done with the top, so you can protect the underside from warping.
While waiting for your polyethylene to dry, you may as well make the rubber feet. Grab your four FB24Zs and tie something through one of the holes in the end. Open your can of liquid rubber and follow the instructions to fully submerge each one before leaving it out to dry. One coat should be enough. Once dry, try to remove excess rubber from the inside using a file or knife.
When everything's had a good long dry (at least a day after final coat), it's time for assembly.
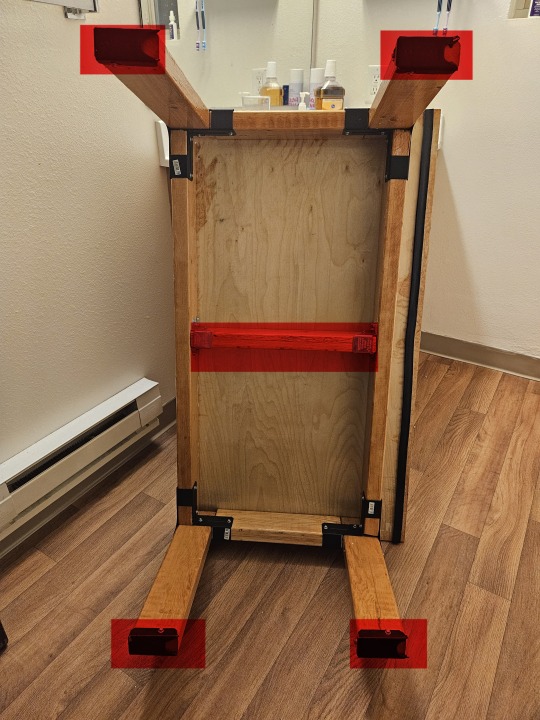
Grab your two 38" boards, your two 13" boards, all four of your legs, and your four RTC2Zs — everything except what's highlighted red in the first photo above. Set the 38" boards down on their narrow side along the long edges of the board, and the 13" boards down on their narrow side along the short edges of the board. Bring them together to form a rectangle, then set the RTC2Zs upside-down on the corners. Each RTC2Z has an L-shaped hole in its bottom; the top/bottom of each L-shaped hole will be filled by the ends of the 38" boards, while the center and left/right of each hole will be filled by the legs. The ends of each 38" board will butt against the wide side of the legs, while the ends of each 13" board will butt against the narrow side of the legs. Now make sure everything is pressed firmly together as you use the Strong-Drive screws to attach the RTC2Zs to the 38" & 13" boards. For each corner, four screws go into the 38" board and two screws go into the 13" board. *DO NOT ATTACH THE LEGS YET!* The legs are just here for spacing right now. Remove the legs when everything is attached.
Grab your 17" board and your LUS24Zs. The 17" board should squeeze in nicely right in the middle, turning your blocky 0 into a blocky 8. Straighten out your LUS24Zs if needed (mine were bowed outwards too much), set them down over the ends of the 17" board, and use 4 screws each to attach them to the sides of the 38" boards. Now grab your long 3" nails and use two on each LUS24Z, installing them at a 45° angle into the remaining holes. They'll nail at an angle into the 17" board and go straight through into the 38" board.
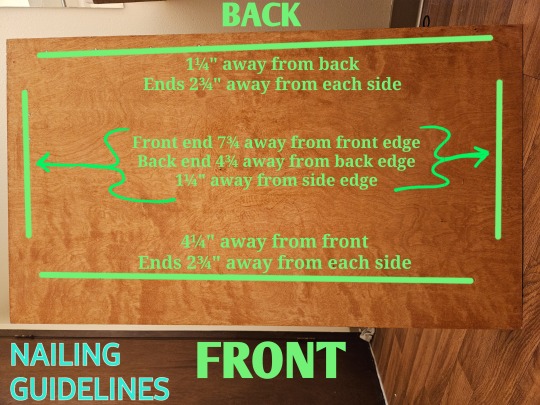
Flip everything over such that the plywood board is now resting good-side-up on top of the mostly-complete frame, with the whole thing resting on the rounded bottoms of the RTC2Zs. Center the frame between the left and right sides of the plywood (should be ½" overhang on each side); let the plywood's back overhang ½" off the back of the frame, and its front overhang 3½" off the front. Now use the 1½" common nails to nail in the plywood into the frame. I used four lines of nails, one for each outer board; measurements are in the second photo above.
OPTIONAL: Apply a final polyurethane coat over the nail heads. This will need a day or two to dry.
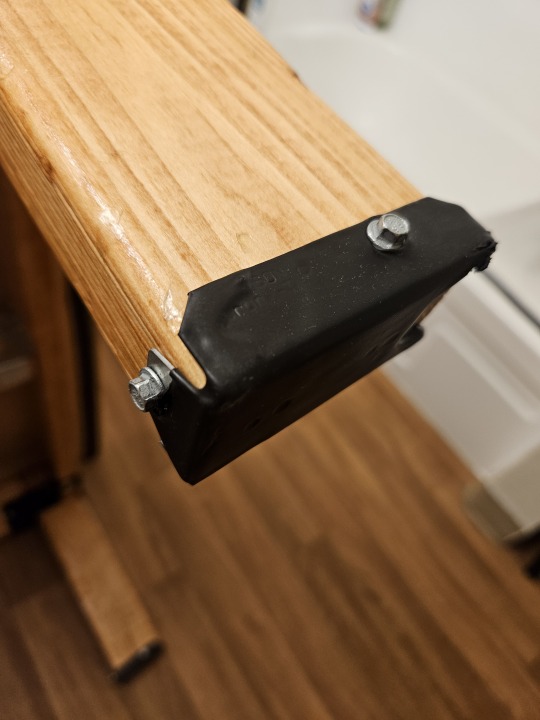
Screw the feet into the ends of the legs. See the third photo above for a reference. Try to make the feet as straight and snug as you can get them.
Insert the legs into the holes left from step 1. The short legs go in on the front side, and the long legs go in on the back side. You should have a bench that tilts slightly forward, to allow for water to drain into the tub. Use some sort of material as a spacer as necessary to adjust each leg to level out the bench. Don't be afraid to introduce gaps between the legs and the plywood; the metal connectors are what hold the weight. Once everything is nice and level, use six screws on each leg to attach then to the RTC2Zs.
Apply your rubber-foam stripping. I applied stripping all along the length of my tub's ledge AND along the underside of my bench.

And you're done! Your bench will look different than the photo above, I hadn't yet added the stripping, the wooden dowel siding, or the feet. And perhaps you chose a different stain color, or made your legs out of pressure-treated wood! In any case, this thing is built like a tank (made with actual home framing materials) and shouldn't break easily. I hope it serves you well!
17 notes
·
View notes
Text
.❀。• *₊°。 ❀°。diy manicure - step-by-step .❀。• *₊°。 ❀°。

step 1: remove any existing nail polish using a gentle acetone-free nail polish remover.
step 2: use a nail clipper to trim your nails to your desired length. then, use a nail file to shape them. Wwhether you prefer square, round, almond, or another shape, file your nails gently in one direction to avoid splitting.
step 3: fill a bowl with warm water and add a few drops of gentle hand soap or a splash of oil. soak your hands for a few minutes to soften your cuticles. after soaking, use a gentle exfoliating scrub to remove any dead skin cells around your nails and on your hands. rinse thoroughly and pat dry.
step 4: apply cuticle oil or cream to your cuticles to soften them further. then, use a cuticle pusher or an orangewood stick to gently push back your cuticles. be gentle to avoid damaging the delicate skin around your nails.
step 5: massage a rich hand cream or moisturizer into your hands, focusing on your nails and cuticles.
step 6: apply a thin layer of base coat to each nail, starting from the base and brushing toward the tip.
step 7: once the base coat is dry, apply your chosen nail polish color in thin, even layers. start with a stripe down the middle of your nail, then one on each side. avoid applying polish too close to the cuticle or skin to prevent smudging. let this coat dry completely before applying the next layer.
step 8: finish your manicure with a layer of top coat to seal in the color and add shine.
step 9: use a small brush dipped in nail polish remover to clean up any polish that may have gotten on your skin or cuticles during application.
step 10: allow your nails to dry completely before using your hands. once dry, apply a drop of cuticle oil around each nail.
⊂(´・◡・⊂ )∘˚˳°
7 notes
·
View notes
Text
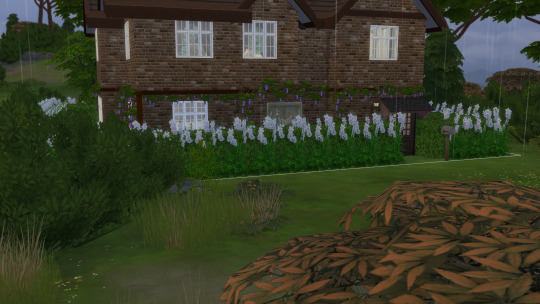

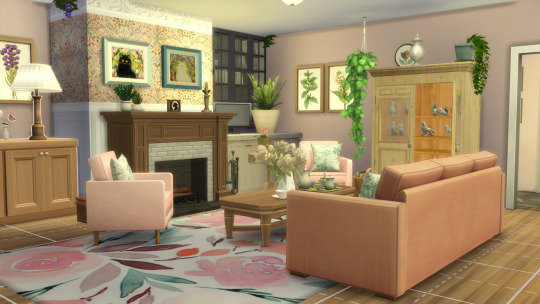

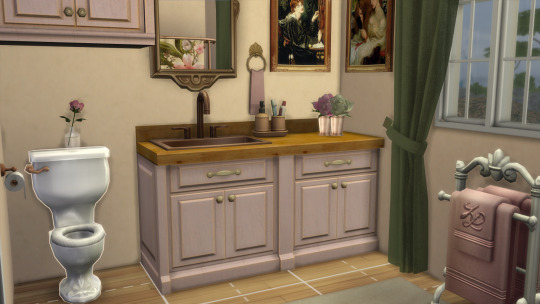
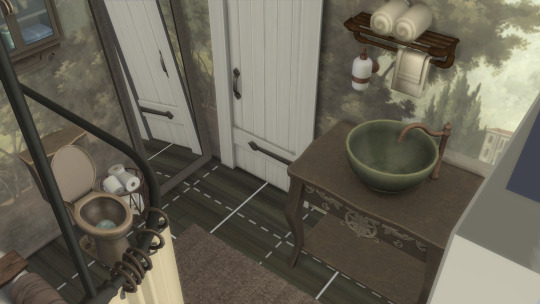
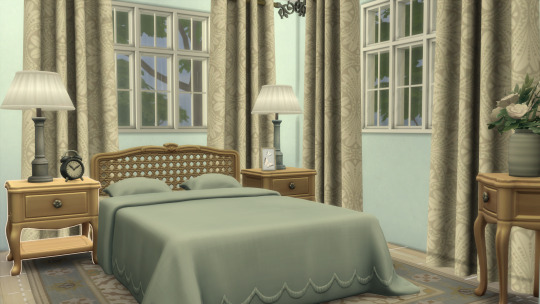
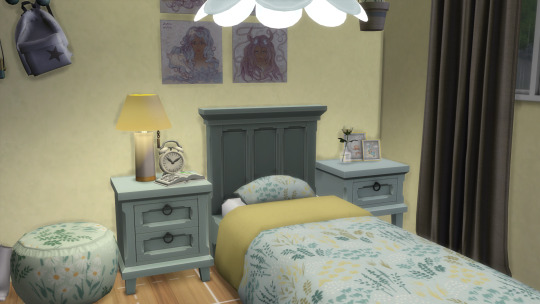
A CC filled lot this time. English-ish House is up on the gallery. 3 bed, 2.5 bath, with a pantry and laundry room. ID jeanbury. All the CC used is written below. Beware, it's a long 'un!
876 simmer-Oslo wardrobe, lowboy dresser, nightstand and standing mirror.
9 sims-DIY stars wall hanging.
Adrestea Moon-Storybook Lover and PJR Paintings.
Ars Botanica-Peonies Pitcher and Peony Jule Cup.
Ameyasims-You're So Vain: Vanity Brush and Hand Held Mirror.
ATS4-Breakfast: Milk Pack, Coffee Jars, Coffe Jar, Milk Bottle, Instant Drink, Tea Tin, Tea Box, Cocoa Powder Box. Fruit Juice Packs, Fruit Juice Glass Bottle, Coffee Bag. Baking: Wooden Spoon,Mechanical Scale, Timer, Canister, Baking Decoration Jar, Dried Fruits, Mixing Bowl, Baking Aids, Flour, Nutella, Baking Aids Stock, Dried Fruits Stock, Electronic Scale, Measuring Cup, Sugar, Jar, Measuring Cups, Rubber Spatula, Pastry Wheel, Candied Fruits. SnowyDay: Gloves, Wall Scarf #2, Wall Beanie #1, Fur Boots, Boots Snowcalf, Wall Coat #1 and #2 Bag Clutter: Tic Tacs.
Awingedllama-Apartment Therapy Potted Vine Round Mirror, Hanging Ivy.
Charley Pancakes-Insomnia: Organic Cotton Bedding. Miscellanea: Book Collection, Standing Books, Book Series.
Desimmy-Tiny Nifty Pictures.
Dew At Home-Hallway Hanging Scarf.
Duckey-Springtime Melody ,mug, Forever Spring Canvas Art, Lil Lilies, Friends and More Friends(these are table mounted frames that are called friends. That's all the information that was given)
Faaeish-BB Wall Decor Pegs and Toy Camera.
Felixandre-Chateau: Alarm Clock, Bedding, End Table, End Table 2, Drawer, Table Lamp, Rug Square, Telephone, Dresser. Grove: Salad Bowl, Lady Sam's Peony Vase, Bedframe V1. Grove-Timbershelf Inside Corner, Flagstone Floor, Cups, Stacked Plates, Stacked Plates 2, Stacked Plates Small, Wall Basket Small, Casserole, Bowls.
Felix and Harrie-Livin Rum: Box Files, Rug, Book Row, Book Series. Orjanic: Table Lamp, Bench, Cushion 2, Book End. Baysic: Toothpaste Container. Florence Fresco Mural. Tiny Twavellers:Hedge Wall.
GhostlyCC-Pre Raphaelite Paintings.
Harrie-Coastal Kitchen: Cereal Boxes, Cabinet Stack, Accent Counter 1 Marble Type, Coastal: Farmhouse Kitchen Sink with Tea Towel, Tins, Sofa, Tv Unit, Display Cupboard, Small Plates, Bowl, Bowl Stack, Cans, , Large Plates. Heritage: Traditional Towel Ring, Bowl Traditional Toilet, Traditional Runner, Landscape Artwork, Traditional Console Table, Floor Lamp, Traditional Round End Table, Traditional Elegant Mirror Small, Traditional Desk, Traditional Bust. Country: CoffeeTable.
Haruinosato-2x1 Curtain 01 Short.
Javabeandreams-Whimsical Animal Portraits.
Kardofe-Vienna Dining Room Curtains, Bella Babies Bedroom Small Pics.
Kliekie-Yove Plants 06, Awipow Plants 11, DecorationsPlants 10 Dragon's Herb. Whisper Laurel Plants 05
Kriss-Scania Build Set:Windows Classic Colonial 2 Tile, Classic Estate 2 Tile,Jugend Cottage 2 Tile.
Leafmotif-Botanical Bathtub, Twee Tableware: 6 Egg bowl, 9 Pot with Lid, Twin Mug Stacks, Whimsy Cake Plate, Short Pitcher. Basil's Favourite Chair 3 Maud Lewis Paintings
Linacherie-Ts2 Olde Tyme Skillets, Billyjean Curio Kitchen: Trays, Clip, Jar. Simlish Art 11, RPC Prints, Sizzling Cuisine Mitts, Delicious Bakery: Cookbooks, Flour Bag.
Madame Ria-Back To Basics: Spice Bottle,Dish Rack, Cereal Box, Pot Holder Wall, Modular Shelves, Coffee Tin, Pot Holder, Stock Pot, Dressing Container, Spice Rack, Counter Grey Scale, Open Book.
Marefc-Half Tiled Walls 2.
MC- Modern Crafter The Short Contemporary Radishly Plant
Menaceman 44-Granny's Brolly Vase.
Midsummersim-Simterest Poster.
Moonlightsim-Photo Frame Memories.
Nocturne-Rustic Cottage: Pokers, Master Curtain, Pedestal Old Miller Tea Set, Deco Retro Vacuum, Not So Shabby Rug, End Table. Grandma Cupboard.
Nynaeve Design-Lyne Half Curtains Blinds V1. Lyne Three Quarters Blinds V2, 1069, 1069 Lyne Radiator 1 Tile.
Okruee- ACNH Bathroom Towel Rack. (Animal Crossing)-
Omorfi Mera- Glass Jars.
PlasticBox- Modular Plant Hanging Pot.
Peacemaker-Hinterlands:Living Throw Pillow, Farmhouse Dining Table, Single Bedframe, Cottage Dining Chair, Bedside Table, Luxurious Single Bedding V1, Arched Mirror, Wardrobe, Bedframe with Footend, Nightstand. Hinterlands Living: Stately Fireplace, Coffee Tray Table, Mantle Mirror, Fringed Pouffe. Hinterlands Dining: Framed Dining Chair, Hanging Clock, Short Petal Pendant Porcelain Lamp.
Piersim- The Office Mini Pack: Higher Plant, Landline, Stackable Book, Printer.
Pocci-S Cargeaux Cabinet RecoloursCyclamen Outdoor, Iris Outdoor, Lilac In A Glass Bottle, Woodcabinet Open (Book cabinet Mini Set), Vintage Tea Set: Teacup With Tea, Milk Pitcher, Cupcake Plate. Magnolia Ceramic Vase, Basket Decor With Slots, Anthropologie Ottoman, Laundry Day Basket on Stool, Steaming Coffee Cup, Marguerite Teacup Empty, Iris In Glass Jar. Single Rose Glass Bottle. Potted Lily Of The Valley.
PTS-Cottage Garden Tea Tin Herbs, Granny's Basket Deco, Deco Mason Jar Short.
Quaylinsims- Paintings Zodiac.
Rhiannon AR-Medium Rug Floral Modern, Long Rug WithModern Floral Patterns
Ricca Bee-Mom's Lamp.
RSVN-Clothes Minded: Fedora, Floppy Hat, Baseball Hat, Sweater. Peg To Differ: Dish Towel, Knife Set, Mug, Utensils. Simmerdown: Cookie Jar, Mason Jar, Mug, Hanging Pots And Pans, Paper Towel, Ceramic Jar, Macaroon Jar. Smeglish Kettle Large.Procraftination:Hoop Large,
RoyIMVU-Seagrass Baskets.
Silverhammer-Executron Executive Desk Throne.
SimMan123-Sheer Right Curtain Short.
Sixam-Spring Six Kitchen: Buttery Toast, T Meg Mid Century Toaster With Toast, TMeg The Terrance, Deco Stove Hood, Olly's Oil Bottles, Kitchen Appliances Stove, Don't Be A Square Plate.
SJB (Yika)-Charlie Set Two CurtainsV1.
Soloriya-Zoe Blinds Part 2.
SYB-Colette: Towel, Toilet Paper Rolls, Soap Dispenser,Wallshelf, Bath, Blanket, Sink, Floor Vertical Mirror, Book, Cupboard, Rug, Bath Tray, Toilet.Millenial: Fridge, Fruit Basket,Utensils Rack, Utensils Pot, Totebag, Spices, Dish Soap. Microwave, Olive Oil, Breadbox, Island, Trashbin, Shower Curtains Short. Highschool Corridor: Hanged Backpack, Sandrine Slippers.
Tianella SE- Honey Herbs Paintings.
Veranka-Yesteryear Loveseat.
Wistful Castle-Wistful Room Pictures, Wistful Lamp #1.
Wondymoon-Cycnus Curtains.
Zeenasims- English Cottage: Paintings, Wainscotting Wallpaper.
ZX-Tagada-Lighting Table Candlestick.
11 notes
·
View notes
Note
#15 for the artist ask game thingy :3

Thank you so much aaa!! ❤️
15. Any upcoming planned drawings
Nothing related to this blog, but I’m thinking of an shotgunshipping animatic for my horror sideblog,,,, mayhaps,,,,
9. Any new art mediums you’ve tried (or overall styles if you haven’t tried new mediums)
This one’s tough because I feel like I’ve picked up so many little hobbies this year but haven’t progressed in skill enough to share any photos. A lot of crochet (crocheting with metal chains, plushies, fun granny squares, etc), beading and diy jewelry. And fiction writing!! I used to write a bunch when I was younger but I haven’t written as much or as diligently in years until Translations. I’m still a pretty slow and inexperienced writer but I’m having sooooo much fun!
6 notes
·
View notes
Text

Get ready to dance away the night at the Strict Tempo presents Body Heat: New Years Eve-Eve Italo Disco Party on Saturday December 30th, 2023 @ Underbelly Seattle (Pioneer Square)
Strict Tempo's 4th Annual Italo Disco end-of-year party!
ITALO DISCO, 80s NEW WAVE, SYNTH-POP & ITALO BODY MUSIC ALL NIGHT
$12 adv/$15 door
8:30 PM doors 9:00 PM music starts
Tickets - https://bodyheat2023.eventbrite.com/ RSVP - https://www.facebook.com/events/1109555546883944
sounds selected by DJ Vox Sinistra Vox Sinistra is a Seattle-based DJ exploring the synthesis of dark underground electronic sounds with retro and modern inspiration, ranging from old-school EBM, industrial and New Beat to minimal and cold waves, forward-thinking electro and techno, and '80s synth music such as Italo disco, acid house, synth-pop, new wave and more. With a background in post-punk, no wave and related '80s alternative and DIY punk movements, she combines sounds with rebellious spirit, nostalgic melodies, and avant-garde genre-mashing that stimulates bodies into movement.She is currently host of dark dance club night Strict Tempo, where she books an international selection of dark electronic artists, and is also known for her post-punk/obscure '80s wave radio show Secret Meaning of Things at KHUH 104.9 FM since 2011, shortlisted for Best Music Show - Alternative in the 2018 Mixcloud Online Radio Awards. She has also been featured in Mixcloud's 'One to Watch' series as a "post-punk extraordinaire" with chart-topping mixes in over 20 genres. https://linktr.ee/VoxSinistra https://linktr.ee/StrictTempo
#vox sinistra#strict tempo#ebm#post-punk#minimal wave#electro#dance punk#new wave#italo#italo disco#italodance#nu disco#disco#seattle#seattle music
5 notes
·
View notes
Text
Essential Carpentry Tools Every Homeowner Should Know About
When it comes to home improvement projects, carpentry is one of the most rewarding and useful skills you can learn. Whether you're building custom shelves, repairing furniture, or installing new trim, having the right tools can make all the difference. In this guide, we’ll walk you through some of the essential carpentry tools every homeowner should know about, making sure you’re prepared to tackle any DIY project with confidence. And if you're looking for expert help, don’t forget that carpentry services from Century Restoration and Maintenance in Marietta, GA, can bring your ideas to life with professional precision.
1. Measuring Tools
Before you even think about cutting wood, you need to ensure you're measuring correctly. Here are the must-have measuring tools for any homeowner:
Tape Measure: A 25-foot tape measure is perfect for most home projects. It’s compact, easy to use, and can measure both small and large spaces.
Combination Square: This tool is incredibly versatile. It can measure and mark angles, check the squareness of corners, and ensure accuracy when cutting.
Speed Square: Ideal for marking straight lines and cutting angles, especially when working on framing or roofing.
2. Cutting Tools
Once you have your measurements down, it’s time to start cutting. Depending on your project, you may need different types of cutting tools:
Handsaw: A traditional tool, perfect for making straight cuts in wood. It’s simple but effective for smaller projects.
Circular Saw: For larger cuts, a circular saw is a must. It’s powerful and allows for faster, more accurate cuts.
Jigsaw: When you need to make curved or intricate cuts, a jigsaw is the go-to tool. It’s versatile and great for smaller, detailed projects.
3. Hammer and Nails
While it may seem basic, the hammer is a tool that should never be underestimated. A claw hammer is the most common and useful, allowing you to both drive nails and remove them when necessary. Pair it with a variety of nails—finishing nails for trim work, framing nails for heavy-duty projects, and smaller nails for delicate tasks.
4. Power Drill
A power drill is essential for any homeowner. Whether you’re drilling holes or driving screws, this tool makes tasks quicker and easier. Get one with a cordless design for maximum portability, and make sure to stock up on different drill bits and screwdriver attachments to handle any job.
5. Wood Glue and Clamps
Sometimes, the best way to hold things together is with glue. A high-quality wood glue will help keep your carpentry projects together with strong adhesion. Pair it with clamps to hold pieces in place while the glue dries. Clamps come in various sizes and shapes, ensuring you’ll always have the right one for the job.
6. Level
Whether you’re installing shelves, cabinets, or a new picture frame, a level ensures that everything is perfectly aligned. It’s especially important when working on large projects like flooring or door installation.
7. Screwdrivers and Screws
A good set of screwdrivers—both flathead and Phillips—will serve you well in carpentry projects. Screws are often the preferred fastener over nails for stronger holds, so it's always good to have a variety of screws in different sizes on hand.
8. Sander
For a professional finish on your carpentry work, a sander is essential. An orbital sander is perfect for smoothing rough edges and surfaces, making your projects look polished and smooth.
9. Miter Saw
If you're working with trim, baseboards, or crown molding, a miter saw is a game-changer. It allows you to make precise angled cuts, ensuring your pieces fit together perfectly for a clean, professional finish.
10. Nail Gun
If you’re working on larger projects, a nail gun can save a lot of time and effort. It’s particularly useful when framing or installing plywood and drywall. The increased speed and consistency make it a valuable tool for any homeowner who’s serious about carpentry.
Carpentry Services by Century Restoration and Maintenance
While having the right tools is key to completing any carpentry project, sometimes it’s best to leave things to the experts. Whether you need custom-built furniture, shelving, or more complex repairs, Century Restoration and Maintenance in Marietta, GA, offers high-quality carpentry services that can transform your home. Their skilled team ensures every project is completed with precision, care, and a keen eye for detail.
From small repairs to complete renovations, Century Restoration and Maintenance is the ideal partner for all your carpentry needs. Let their team of professionals bring your vision to life with a level of craftsmanship that only years of experience can provide.
So, next time you're thinking of tackling a carpentry project at home, consider reaching out to Century Restoration and Maintenance for expert assistance—you’ll be glad you did!
0 notes
Text
Top 10 Uses for Square Brass Plates in Industrial and Artistic Applications
Introduction Square brass plates are highly sought after in a variety of industries due to their unique combination of strength, durability, and aesthetic appeal. Whether you're a manufacturer, designer, or DIY enthusiast, brass plates from Accromet in Monroe, NC, provide the perfect solution for numerous applications. In this post, we’ll explore the top 10 uses for square brass plates and answer some frequently asked questions to help you make the most of this versatile material.
Primary Keyword: Square brass plates Monroe NC
1. Decorative Panels and Trim Square brass plates are a favorite in interior design, often used for decorative panels, trim, and furniture accents. Their natural shine and resistance to tarnishing make them a long-lasting choice for high-end aesthetics.
2. Electrical Components Brass’s excellent conductivity and resistance to corrosion make square plates an essential material for electrical terminals, connectors, and other components.
3. Architectural Features In architecture, brass plates are used for custom features such as plaques, signage, and ornamental designs. Their durability ensures these elements withstand the test of time.
4. Industrial Machinery Brass plates are commonly utilized in industrial settings for components like bearings, gears, and bushings due to their low friction and high strength.
5. Jewelry Making Jewelry designers favor brass for its gold-like appearance and workability. Square plates can be cut and shaped into custom designs, adding elegance to handmade pieces.
6. Marine Applications In marine environments, brass plates are used for fittings and decorative elements due to their excellent resistance to saltwater corrosion.
7. Heat Exchangers Brass’s thermal conductivity and resistance to heat make it an ideal material for components in heat exchangers and radiators.
8. Sculptures and Artwork Artists use square brass plates as a medium for sculptures, engravings, and mixed-media projects, taking advantage of their malleability and visual appeal.
9. Musical Instruments Brass is an integral material in musical instruments, and plates are used for components like reeds, valves, and decorative inlays.
10. Restoration Projects Brass plates are perfect for restoring antique furniture, hardware, and architectural elements, maintaining the integrity and authenticity of historical pieces.
FAQs About Square Brass Plates
Q: Why should I choose square brass plates from Accromet in Monroe, NC? A: Accromet provides high-quality brass plates with consistent dimensions and finishes. Their local availability in Monroe, NC, ensures quick delivery and reliable customer support.
Q: Are brass plates suitable for outdoor use? A: Yes, brass is resistant to corrosion and tarnishing, making it a great choice for outdoor applications.
Q: Can I customize the size of the brass plates? A: Absolutely. Accromet offers customization options to meet the specific requirements of your project.
Q: How do I maintain the shine of brass plates? A: Regular cleaning with a brass polish and a soft cloth can help maintain the shine and prevent tarnishing.
Q: Are brass plates eco-friendly? A: Yes, brass is recyclable and has a long lifespan, making it an environmentally friendly material choice.
Conclusion Square brass plates are incredibly versatile, finding applications in industries ranging from manufacturing to fine arts. Accromet in Monroe, NC, is your trusted source for high-quality brass plates that meet the demands of your projects. Whether you need them for industrial machinery or a creative masterpiece, brass plates offer unmatched durability and style.
Ready to get started? Contact Accromet today to explore our range of square brass plates!
0 notes
Text
DIY Square Baking Pan Non-stick Cake Mold 8 Inch High Square Pan Square Cake Mold
Product information: Product Category: Cake MouldShape: regular polygonMaterial: carbon steelPacking specification: 22.5*5cmPurpose: Cake moldSpecifications: [3080-001] 9-inch square plate-black, [3080-002] 9-inch square plate-gold, [3433-003] 9-inch square plate-blueWeight: 250g Size Information:Packing list: Cake mold*1 Product Image:

View On WordPress
0 notes
Text
How to Install Wooden Herringbone Flooring in Chatswood
Herringbone is quickly becoming the must-have floor pattern of the year. However, that is a flooring design in order to in no way go out of favor. The zigzag-style sample that a herringbone format creates is especially captivating, and when you operate notable wooden herringbone flooring Chatswood, this design can easily make a room stand out. Due to the extent of detail concerned, this DIY floor undertaking may be tough, but with the proper materials and substances, you can do it over a long weekend. Find out the way to lay herringbone floors in 9 steps.
Pre-Installation Prep
Choose the Right Flooring Material
While herringbone floor designs are rather bendy, you’ll want to make certain you pick the best possible sort of laminate timber flooring Killara for this assignment. Prefinished engineered hardwood floors are a smart preference because it’s surprisingly clean to put in and look remarkable without additional stains or finishes required. Hardwood floors are also a first-rate select because they will supply any room a tremendous sheen that stands to take a look at of time. While you may also deploy some varieties of floor tiles, like bamboo vinyl floors, in a herringbone sample, this DIY project will recognize engineered timber floors.

When you order your engineered hardwood floors, be sure to order a touch greater than you want. In that manner, you’ll have a few extra slats in case of a mishap or a miscalculation.
Gather Your Tools and Supplies
You’ll want a protracted listing of tools and elements for this DIY project. Make sure you have the following accessible:
Engineered hardwood flooring
Border flooring strip
Apron flooring strips
Chalk line tool
Circular noticed
Router
Rubber mallet
Wood glue
Rafter squares
Tape degree
Spare piece of 3/four-inch plywood
Screws
Flooring nailer
Flooring splines
Flooring nails
Painter’s tape
Prepare the Subfloor
Before you start laying out the herringbone pattern or installing the floors, make an effort to put together the place. Make certain the subfloor is in suitable circumstance and that it’s a complete stage. If you don’t take a look earlier than you began, you might locate that an uneven floor can require you to begin over from the start.
Installing Herringbone Pattern
Find the Center and Establish the Field
When you’re equipped to start working at the design, use the tape degree to locate the center of the room. Next, use the chalk line to create a line that extends down the center of the room, from one wall to the other. Since the herringbone design gained’t cowl each inch of the ground space, you’ll additionally want to format the square subject that the layout will occupy. Use the tape measure and chalk line to establish the border.
Cut the Flooring Slats
To discover the most appropriate slat duration to your design, format part of the design and use rafter squares to preserve the slats at 90-diploma angles. You’ll find that the slats ought to be trimmed to a more than one of their width to work with a given layout. Once you’ve settled on that more than one, use the circular saw to trim the slats to the exact same duration. Remember to trim the tongue aspect of every slat.
Next, add grooves to each slat so that they’ll fit collectively correctly. Set your router based on the groove of an current slat. Double check that the slats will healthy together, and then rout the quit of each slat you trimmed.
Create and Set a Nailing Blank
To create the nailing blank, for you to be your template as you install the hybrid flooring Gladesville, turn a bit of three/4-inch plywood right into a right triangle. The lengths of the 2 sides have to precisely match the period of your flooring slats. Draw a centerline down the middle of the nailing blank, and then position it on the centerline you made on the floor with the lengthy side alongside the pinnacle border. Screw it into the subfloor, and use the router to create grooves along the two same edges.

Secure the Flooring
Put the first slat in location so it traces up flawlessly towards the nailing clean. Place the second so it overlaps the cease of the primary slat even as lined up in opposition to the nailing clean. Make certain the tongues face out. Use the floors nailer to place nails each few inches alongside the primary slat. Use a mallet to hit the floors nailer, and ensure the slat is stable. Do the identical for the second slat.
Add subsequent slats to create the herringbone pattern, taking care to place slats at a time. Do this until the pattern reaches the opposite border.
Remove the nailing blank, and flip it around so the flat facet now faces the border opposite wherein it started out. Place it so it fits well into the tongue of the slat you closing set up. Screw the nailing blank into the subfloor again.
Place a new slat so it lines up smartly towards the nailing clean and overlaps with the slat you simply laid. Continue the pattern till you attain the other border, and keep up this cycle of putting in slats and reversing route until you’ve filled the place inside the border.
Fill in Empty Spots and Trim Extra Material
The nailing clean will depart a few empty triangle regions, so you’ll want to head back and fill them in. Use wooden glue to add a floors spline into each groove, successfully turning it right into a tongue. Then nail greater slats into location, following the herringbone sample, until you’ve filled within the empty space.
Next, you’ll want to trim the extra cloth that overlaps the border. Use a strip of painter’s tape to mark wherein you’ll reduce, and use a round noticed to make the borders first-rate and neat.
Add Borders
Finally, it’s time to feature borders across the engineered timber flooring Roseville. Use the router to create grooves round all four sides of the flooring, and then use wooden glue to connect flooring splines inner every groove. Use the floors nailer to area the decorative border strip across the herringbone pattern. Then use the nailer to put in the apron strips across the border. When you’ve crammed the space and reached the encircling walls, the floors set up is complete.
Once you’re completed, step back and admire your work. Not best do you have got an remarkable new ground, however you furthermore may have an notable new layout feature that’s positive to encourage at least a couple of decor improvements. While this academic focused on hardwood floors, you can lay other forms of flooring tiles within the herringbone fashion, such as ceramic tiles and plenty of unique types of vinyl floors.
0 notes
Text
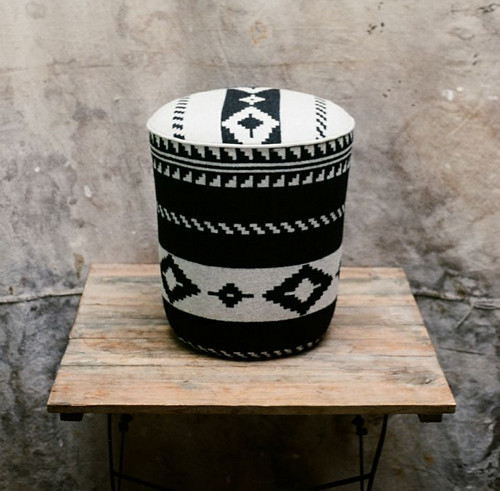
DIY Utility Bucket Ottoman
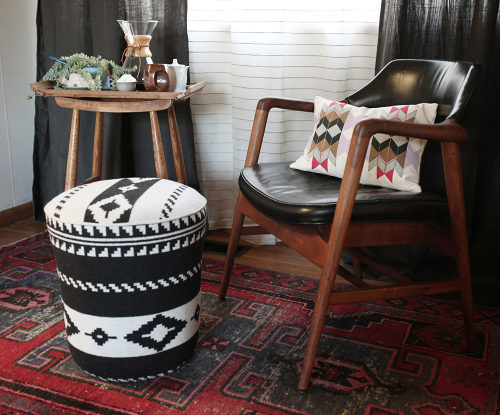
Project by Commonwealth Vintage Rentals and Revive Upholstery & Design:
I love a clever DIY project, especially when it uses an unexpected or overlooked material. This project uses a humble orange utility bucket as the base of an amazing upholstered ottoman. The product of a collaboration between Liz and Rachel of Commonwealth Vintage Rentals and Leland of Revive Upholstery & Design, this utility bucket ottoman was inspired by a trip to Home Depot. Looking for materials to build their own furniture, Liz and Rachel stumbled upon this bucket and explained that they were “hesitant and a little embarrassed to even think of using a plastic bucket,” but they were swayed by the (low) price and decided to pick up a few and team up with Leland to create something custom. Using Pendleton fabric, Leland upholstered the bucket (I never thought I’d write that sentence) and created a project that proves, without a doubt, that even the simplest and least expensive materials can be turned into something beautiful with a little hard work. Thanks so much to Liz, Rachel and Leland for sharing this how-to with us! xo, grace
Materials
yardage for fabric
chalk
scissors
spray Glue
stapler
5-gallon utility bucket
ruler
turkey carver
sewing machine
tape measurer
piping foot (The cord we used is 5/32 and is sold by the yard.)
foam (20′ square of 3” high-density foam and 60” x 1” of foam)
Dacron
square ruler
Instructions
1. Take off the bucket handle and measure the top of the bucket (38″) — the bucket tapers at the bottom, so you need to measure the top and bottom — measure the bottom (33”) and measure the height (17 1/2”). You can also wrap the foam around the bucket and cut accordingly.

2. Mark out the foam with your ruler. Draw out 38”, mark the middle of it and split from the center 33”. Measure 17 1/2” for the vertical foam with the height of the top layer of foam. Cut foam.

3. Spray glue on the bucket and foam, and wait a few seconds for the glue to set and get tacky.

4. Take the lid and trace the top of it onto 3” high-density foam. Spray glue the lid to the foam. Take your turkey carver and cut around the edges of the lid. Snap the lid back onto the bucket. Bring the 1” foam around the lip of the 3” foam.

5. Trim any extra pieces.

6. Take Dacron and spray it with glue to the top of the bucket. Cut off the remaining pieces. Continue to wrap and spray glue the bucket with Dacron. Trim the top but leave extra Dacron on the bottom for finishing.

7. Measure and draw out the longest side of your pattern and mark the center. Take your square and line it up with the edge of your fabric and the center mark. Draw out the height of your pattern on your square. (Note: It is always smart to add 1–2” of extra fabric to your height for fitting; it can always be trimmed down later.) Once the height has been drawn, use your square again to mark the length of the opposite side (remember your height line is at the center, so measure half the length on each side of your center mark). When the two lengths have been drawn out, use your ruler to connect the ends, giving you a nice straight taper.

8. Cut the piping fabric 1 1/2” wide and the same length as the top 46”. Cut the top piece in a 16” circle (allows seam allowance) either by tracing the top or using a string and pencil.

9. Fold the fabric in half and clip the middle top corner. Do the same with the circle piece.

10. Sew in the piping with welt foot. Extend the fabric a small amount past the piping. Sew a 1/2” from the needle. When you start to sew piping on the circular piece, start just in from the cut edge. Cut relief cuts around the perimeter so that the fabric doesn’t pucker when sewn into the side panel. Note: Sew fabric on the piping first, then line up the edge of the piping and the edge of the circle fabric and begin sewing. Make small relief cuts in your piping so it is easier to sew.

11. With side panel folded, sew from the top down with at least 2” at the bottom open, so that it fits over the top of the ottoman.

12. With the seam of the side panel laid flat and the seam of the top panel, start to sew the two pieces together.

13. Test-fit the fabric to make sure it fits smoothly over the ottoman. This requires a little finessing of the fabric to get a snug fit.

14. If fit is smooth, remove the fabric and cut the extra fabric around the edges so the end product has a flush, smooth surface.

15. Pull the fabric over the ottoman again. Rotate it, pulling downward on each side. After the fabric is smooth and in place, staple the fabric to the bottom of the bucket. Start stapling in sections around the circle and then go back and staple in between. If you just went fully around the first time, you would end up with extra fabric at the end and the pattern could be crooked.

16. Take a razor blade and cut off the extra fabric.

17. The last step is a dust cover for the bottom. Voila!

7 notes
·
View notes
Text
10 Budget-Friendly Home Renovation Ideas for Singapore Homeowners
Are you feeling the pinch but itching to revamp your space? No worries—there are many budget-friendly home renovation ideas Singapore homes. In this blog, we discuss simple tricks for creating a functional and good-looking space while staying within your budget.
Maximising Small Spaces: Affordable Renovation Ideas for HDB Flats
It’s possible to transform your HDB flat into a stylish and functional space without subsisting on instant noodles for a month. Here are some affordable renovation ideas:
1. Transform your HDB flat with space-saving furniture.
Look for dual- or multi-function pieces that are compact — like a coffee table with storage for magazines, books, and remote controls, or a bed with built-in drawers for storing seasonal clothes and extra linens!
2. Go for modern minimalist designs.
Minimalism is one of the most popular home renovation ideas in space-constrained Singapore because this design approach makes even tiny spaces look more prominent. Choose neutral tones and clean lines to make a room feel airy.
3. Invest in out-of-sight storage options.
Hidden storage is king, where square footage is limited. Consider utilizing under-bed storage for bedding and seasonal clothing. Do you like books but not the clutter? Put ottomans with built-in storage in your living room! Aside from your books, you can also toss remotes, magazines, or board games inside them when not in use.
4. Refresh your home with a simple paint upgrade.
One of the most affordable ways to refresh your home’s look is to repaint, whether with a fresh coat of white or a new, bold color.
5. Apply removable wallpaper.
Create a feature wall with lighter, darker, or complementary paint to the rest of the room!
6. Refresh the look of floors with durable floor paint or peel-and-stick tiles—
there is no need to rip out old flooring or hire expensive contractors.
7. Get a new splashback for your kitchen!
These reno projects are surprisingly easy because you can now buy DIY tile kits.
8. Update the hardware on the kitchen cupboards.
Replace old handles and knobs with new ones, et voila 0 —your kitchen will look instantly refreshed!
9. Go smart.
One of the hottest trends in home renovation ideas Singapore is innovative technology integration, particularly those that enhance efficiency and convenience. Smart home systems like automated climate control and lights that automatically switch on or off and adjust brightness can optimize space and functionality. Plus, they improve energy use, contributing to a sustainable lifestyle.
10. Try sustainable and budget-friendly renovation materials for Singapore homes.
Eco-friendly and sustainable materials are also excellent choices for modern home renovations. Consider using materials that are good for your health and the environment, such as recycled glass countertops, bamboo flooring, or low-VOC paints.
Find more home renovation tips from the experts.
Visit Renodots and discover more budget-friendly home renovation tips from professional interior designers. The platform can help you get and compare quotes from reputable renovation contractors in Singapore.
0 notes
Text
9 best DIY under-bed storage ideas to maximize space

Under-bed storage is a great way to create extra space in smaller bedrooms and studio-style apartments. From storing seasonal clothes and shoes, extra bedding, or any number of other items, under-bed storage boxes or drawers are a great idea for anyone looking to add storage to their small bedroom. While many individuals may choose to purchase a pre-made bed frame with built-in storage, others may prefer to follow a quick tutorial and undertake a bed storage DIY project to create the perfect solution for their needs. There are countless under-bed storage ideas out there, including super cheap wood boxes and repurposed materials like dressers. Today, we’re taking a look at the best bed storage ideas to help you get started on your next DIY masterpiece.
A Cozy Sleeping Nook With Deep Under Bed Storage Space Made of Raw Materials
You can use unfinished wood, wood glue, and screws to create simple under-bed storage boxes that you can place your mattress directly on top of. This is a great idea for anyone who prefers a more natural, effortless look in their house. The beauty of this design is that it’s incredibly easy to DIY, yet is completely customizable. You have the option to stain or paint the wood, add drawer pulls, install standalone wheels or a track slide, and so much more. This example places the bed snugly in a recessed area of the room to make a cozy sleeping area. It also uses neutrals and dark tones to both complement and contrast with the raw wood storage boxes.


via Stadshem
A DIY High-Set Wooden Bed Frame With Large Storage Boxes Underneath
If a large, fixed under-bed storage layout isn’t your style, but you still like the idea of using raw materials in a simple design, this might be the option for you. Instead of building a big square box for your mattress to rest on, opt to build a raised platform with fully removable bins on wheels. This will allow you to easily access the bins to store and retrieve your items without hassle. Additionally, the specific layout and appearance of this design are even more customizable than the previous idea. You can rearrange, remove, add, and decorate these bins as you see fit.

Styled by Martina Mattsson, photographed by Krister Engström for Kvarteret Makleri
Cabinet-Style Drawers Under the Bed for Extra Storage Space in a Studio Apartment
Under-bed storage is a must-have when living in a studio apartment layout. However, this type of layout means that whatever storage option you choose must coordinate with the rest of the room’s decor in a way not seen with a traditional bedroom setup. This example idea uses the same style of cabinetry found in the kitchen area to make a matching drawer design under the bed, just in a different color. The result is a subtle, classic look that doesn’t pull attention away from the other elements in the room. This bed is also set a bit higher than some other ideas, creating additional space to store items you’d prefer to keep out of sight.

via Entrance Makleri
Repurposed Old Dresser Drawers to Efficiently Utilize the Space Under Your Bed
If you enjoy repurposing thrifted or hand-me-down furniture, you can make your own custom under-bed storage setup by giving an old dresser new life. Simply build a support platform for the bed and secure a set of drawers at the front for a unique, effective means to store all of your stuff when not in use. This under-bed storage design is a perfect example of the kind of results you can see from this type of project. The bottom drawer row protrudes to act as a step to help ease the process of climbing onto a tall bed that doesn’t have another access point. Drawer fronts and trim are painted with a breathtaking blue tone that exudes calm and draws the eye to the ingenious design.

via Entrance Makleri
Refinished Cabinetry for a Super Easy Bed Storage Solution You’ll Absolutely Love
In a similar fashion to one of the previous bed storage ideas from above, this bedroom uses cabinetry as a storage solution. However, these cabinets use shelves to organize the stored items, which may be more convenient for some. There’s also an opening where you can house frequently used items, such as a clothes hamper while keeping the floor clear. This setup would be ideal for a child’s room, allowing for plenty of accessible storage for toys, shoes, and clothes alongside room to play.

Styling by Grey Deco, photography by Jonas Berg for Stadshem
Customized Steps and Built-In Storage Made From Raw Plywood for a More In Depth DIY Project
Anyone looking to tackle more in-depth bed storage ideas may prefer to build a more intricate storage system. One popular choice is to build an elevated platform with a small set of stairs leading to the bed itself. This leaves plenty of space underneath the platform for a complete storage system of boxes, shelves, drawers, and more. This example design uses raw materials, though painting or staining the wood is an option if you so choose. The plywood has been continued up the wall, creating a unique surface for coat hangers and task lighting for a truly personalized space.

Styled by Pella Hedeby, photographed by Ragner Omarsson for Ikea Livet Hemma
Discrete Bed Risers With Enough Storage Space for an Unconventional Room
When dealing with limited floor space or needing an extra bed where a traditional room doesn’t exist, under-bed storage can be the answer you’re looking for. As seen in this example image, you can place a bed in an area that is easily divided from the rest of the space, in this case with curtains. Then you can utilize an under-bed box or two to store items when not in use. Wheels can be a fantastic addition here as well to help make it easier to get to your most used things and protect your flooring from scratches. The storage boxes here have discrete hinges on the doors for a sleek, seamless appearance, though you can attach handles or knobs to make opening them a simpler process.

Styled by Thomas Lingsell, photographed by Therese Jahnson for Historiska Hem
A High Bed For Easy Access to Even More Storage in a Compact Room
Built-in under-bed storage is the perfect solution to compact bedrooms, such as those in city apartments or college dormitories. By utilizing the vertical space in the room, you’ll be left with much more floor area for other furniture without crowding the bedroom unnecessarily. In this example image, the raised bed allows for a small desk to be comfortably placed against the wall for a quaint workspace. The decor is both slightly abstract and mature, providing an air of focus without becoming too stuffy.

Styled by Bon Interior, photographed by Mariah Salander for Bjurfors
Apothecary-Style Old Drawers Help Organize All Kinds of Small Supplies With a Charming Touch
For the final example in our list of bed storage ideas, we’re taking a look at an eclectic and truly unique solution. This apothecary-style drawer unit brings a certain charming air to this bedroom area. There are plenty of places to store all sorts of items, and you can even utilize the nameplates in the center of each drawer to keep everything organized if you choose. Using this style of storage in a room filled with a variety of textures, patterns, and colors results in a slightly Bohemian design that’s bursting with personality.

via Historiska Hem Read the full article
0 notes
Text
Price: [price_with_discount] (as of [price_update_date] - Details) [ad_1] Product Dimensions- Middle Shelves- 80 x 30 CM, Side Shelves- 35 x 30 CM, Total Height- 54 CM, Weight- 9 KG. Material- Partcile Board and Stainless Steel Hollow Pipe- 1 Inch. With a simple yet stylish design, this product will improve the look of your home. This high-grade Engineered Wood, durable laminate, and metal entertainment center provide open storage for your electronics, books, and more. This versatile tv stand features clean lines and a compact design that's ideal for homes with smaller square footage. The sleek frame is built from a mix of engineered wood and Stainless Steel Pipe with an array of rustic finishes to choose from that best suit your taste. Assembly Required: DIY (Do-It-Yourself) Installation, It means you'll have to install it yourself or arrange a carpenter to install it for you. It comes with the necessary hardware including a detailed installation guide. Product Dimensions- Middle Shelves- 80 x 30 CM, Side Shelves- 35 x 30 CM, Total Height- 54 CM, Weight- 9 KG. Material- Partcile Board and Stainless Steel Hollow Pipe- 1 Inch. Warranty : 2 years warranty on manufacturing defects. [ad_2]
0 notes